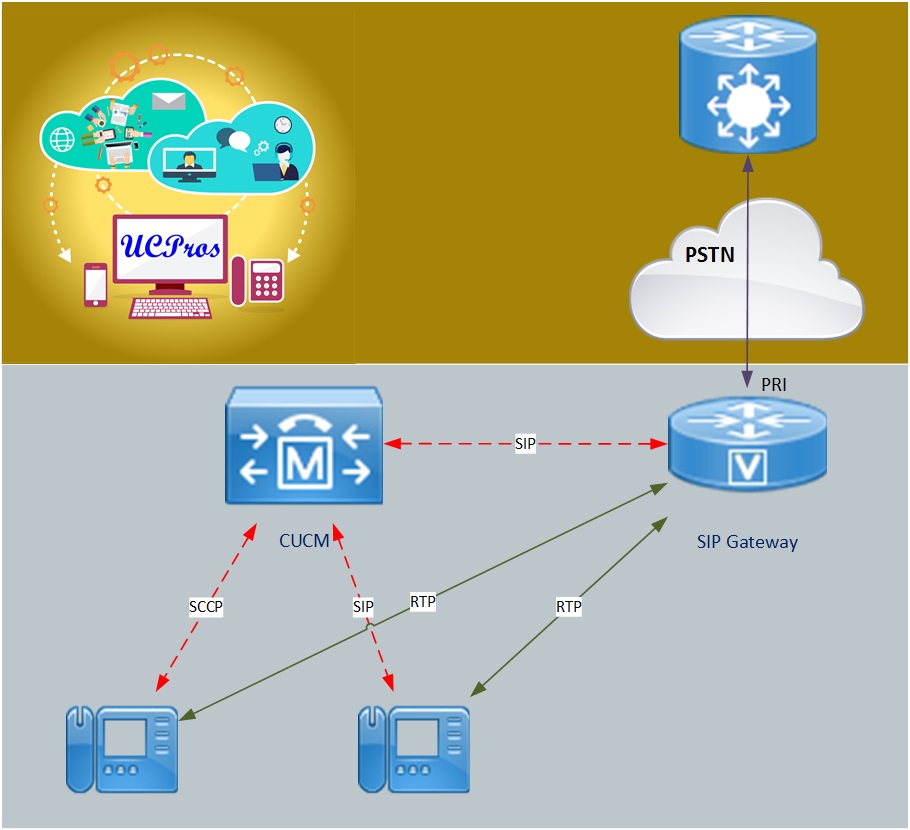
 Connecting the Cisco IOS Voice Gateway to CUCM via SIP has been the preferred way to do it in the past couple of years.
The slowly dying H323 protocol (ISDN based) is not being developed anymore while SIP (HTTP based) became the industry standard for VoIP. So whenever PSTN connection is implemented via an IOS Voice Gateway, the choice should be really between SIP & MGCP.
This is how it’s done, step by step, using SIP.
Edit: I recommended using the SIPgw Config Utility in conjunction with this post
Problem is, that implementing a Cisco SIP gateway often requires an extra touch, and while widely documented, Cisco SIP Gateway configuration documents often lack the proper structure and context, which makes it very difficult to navigate and find your way to a proper, clean SIP gateway configuration.
In this post, I will do my best to lay down the basics and the advanced topics around Cisco SIP Gateway configuration and implementation.
The implementation of SIP-based Voice Gateway is roughly divided into two parts:
1. CUCM SIP Trunk configuration: Build the connection on the CUCM side towards the Cisco SIP Gateway.
2. Cisco IOS SIP Gateway configuration: Configure SIP on the voice router and integrate it with CUCM.
This will also be the structure and order I’ll be using in this post, so let’s get to work.
Contents
CUCM SIP Trunk configuration: Build the groundwork
The first step would be to configure the different parameters that we’re going to use in our SIP Trunk. These are divided into few groups:
CUCM Device Pool
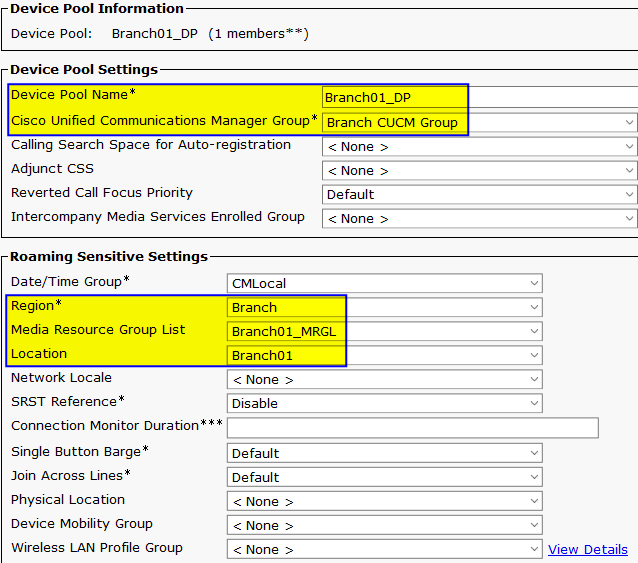
Device Pool is a common set of configurations that the SIP Trunk will be using. The Device Pool, as the SIP Trunk, has some hierarchy involved, so we’ll need to set up some parameters first.
Let’s break it down:
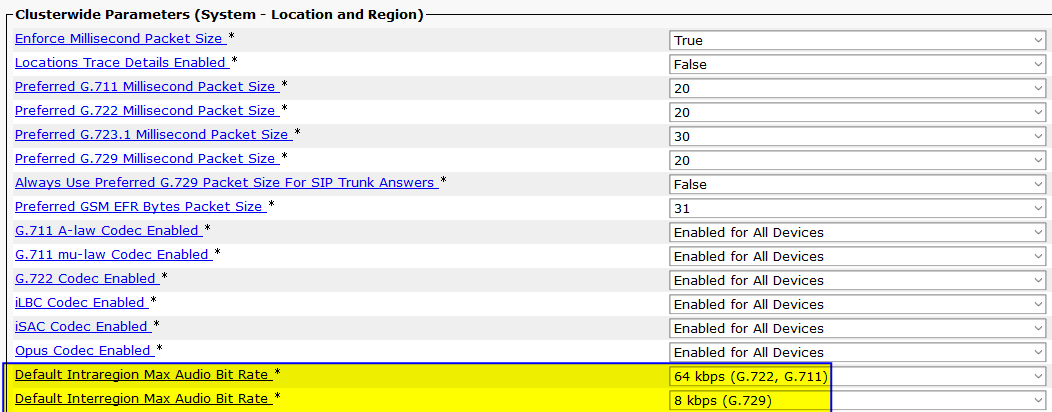
CUCM Region- Codec selection
The Region parameter will define the codec preference for our SIP Trunk. Specifically, the codec that will be negotiated between the Cisco SIP Gateway and the device it’s going to talk to (i.e an IP Phone, UCCX, Unity Connection ,etc.).
The basic rule is: Calls within the same Region should use the best quality codec, calls between Regions should use bandwidth-sensitive codec.
The default Intra-Region bandwidth is 64kbps (g.711/g.722), the default Inter-Region bandwidth is g.729 (set in service parameters) so only change it if you specifically have to.
To change the bandwidth go to System–>Region Information–>Region.
Cisco Unified CM Group
The Cisco Unified Communications Manager Group parameter is the place to choose with which CUCMs the Cisco SIP Gateway is going to work with (signaling wise). Your CM group should be set by now, if it isn’t, now is the time.
Go to System–>Cisco Unified CM Group and choose the CUCMs.
If it’s a small-medium implementation with two CUCM nodes, use the CUCM Subscriber first and CUCM Publisher second.
CUCM Media Resource Group List
This is the place to pick all of your media resources that the SIP Gateway will be using. I won’t elaborate too much on Media Resources here, simply consider what the Cisco SIP Gateway will need:
MOH server, Annunciator, Transcoder (specifically if that’s a branch router with limited bandwidth and you have g.711 only devices in HQ).
CUCM Location
Location will define the number of calls available between the Cisco SIP Gateway location and other locations.
Whenever you are using a simple Hub & Spoke topology, check the dedicated VoIP bandwidth from the branch router to HQ (set within the priority queue in the router) and assign the audio bandwidth accordingly. David provides a great video explanation in his course (lecture 35 is free) if you want to dig deeper.
If you have a slightly more advanced inter-site connectivity, you might want to use the Enhanced Location CAC feature.
The bandwidth calculation for the Location is not the same as configured in the router’s policy-map/Interface, so don’t fall into this trap. While in the Location screen, go to Help–>This Page and set the value based on the proper bandwidth.
After some hard work, we are all set to configure the Device Pool!
Go to System–>Device Pool and create a new Device Pool for our SIP Trunk using the parameters above.
Two more things we have to prepare before our trunk can be configured:
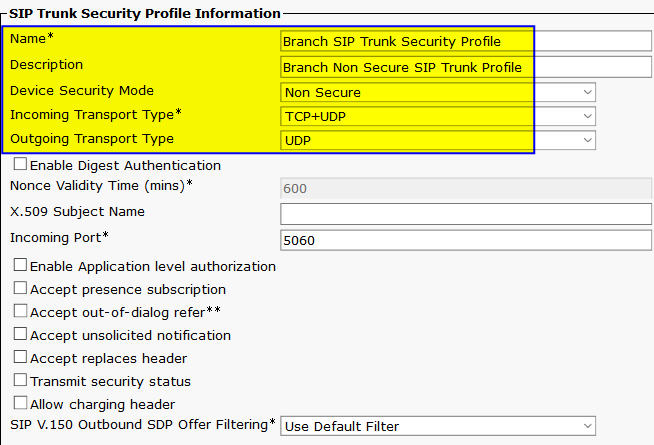
CUCM SIP Trunk security profile
The SIP Trunk security profile is something we have to take into account whether we are using a secure SIP/RTP communication or not. I will not elaborate on secure trunks here as it is a full post topic by itself.
The one thing we have to pay attention to with the SIP Trunk security profile is the transport type.
You can set the Incoming Transport Type to accept TCP & UDP or one of them, depends on the amount of hardening you want to apply.
For the Outgoing Transport Type, set either UDP or TCP, just make sure that you set the same session transport type in the Dial Peer.
The default session transport for Dial-Peers is UDP.
Go to System–>Security–>SIP Trunk Security Profile, copy an existing one and update the parameters.
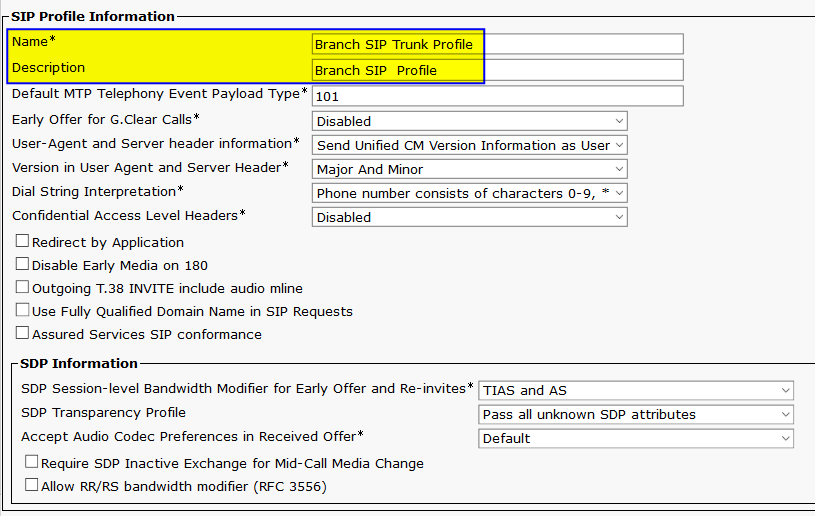
CUCM SIP Profile
SIP Profile is where the SIP magic happens for the SIP Trunk.
With dozens of different options and parameters to play with, it might be a bit intimidating at first but we will keep our focus and stick to the relevant ones.
-
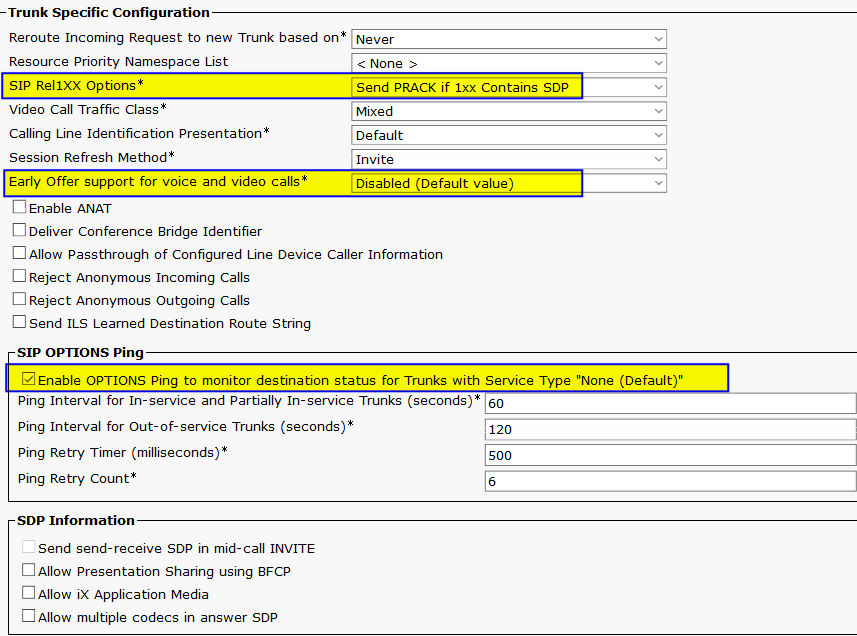
- SIP Rel1XX Options The default for this one is disabled, and it’s fine to leave it that way unless you are having issues related to early media and silence on the line.
This parameter can help the parties in the call to establish a media path and exchange SDP prior to the call being answered.
Whenever you are running CUCM based Call Queuing, you should set this parameter to Send PRACK if 1XX contains SDP.
- SIP Rel1XX Options The default for this one is disabled, and it’s fine to leave it that way unless you are having issues related to early media and silence on the line.
- Early Offer support for voice and video calls is a crucial parameter when shit hits the fan. It sets CUCM’s behavior in regard to using Early & Late Offer and controls the insertion of MTP to the call. It is very important as MTP in the call flow should only be used when absolutely necessary.
Let’s try to understand what is what before we configure this:- Early offer: Is described as a situation where the call initiator sends SDP(media negotiation parameters) in the Initial Invite message.
- Delayed offer: with Delayed Offer the call initiator waits for the called side to send SDP first and then answers with its own media parameters in the 200OK message.
Now, consider a situation where both sides (let’s say CUCM and the Cisco IOS SIP Gateway) are configured to use Delayed Offer only. In this case, SDP will never be sent thus the call will fail. Not exactly the result that we are after.
CUCM by default will use Delayed Offer on its trunks and let the called side to the set the tone (codecs priorities) for the call.
As mentioned, not all devices and scenarios support this configuration and some modifications might be required in some cases. The options CUCM is offering are such:
- Disabled (Default value) – Disables Early Offer; no SDP will be included in the initial INVITE for outbound calls.
- Best Effort (no MTP inserted)
-
- Provide Early Offer for the outbound call only when caller side’s media port, IP and codec information is available.
- Provide Delayed Offer for the outbound call when caller side’s media port, IP and codec information is not available. No MTP is inserted to provide Early Offer in this case.
- Mandatory(insert MTP if needed) – Provide Early Offer for all outbound calls and insert MTP when caller side’s media port, IP and codec information is not available.
In most cases, we should be fine with the default option of Disabled. If you are having an issue and MTP insertion fixes it, I suggest you check the root cause that summed up MTP in the first place as it might be fixed with proper codecs and Prack adjustment.
A question comes to mind here, why not just let the MTP loose and the hell with it?? After all, that is what we’re paying it to do right?? Well, that is very brave of you to ask!
There are several reasons why you shouldn’t use MTP for your calls, on the exception of very few cases.
- It changes the RTP media flow. If your MTP is not on the Voice Gateway (it can be.. both SW and HW based), then your CUCM is, which means it’s in the RTP path. And you don’t want that because:
- Media handling and termination can be CPU intensive, if you have a lot of calls, it is just a very bad practice and trust me, it will come back to haunt you.
- It shows exactly how damn lazy you are. Patching around instead of taking care of the real problem. A great man once said:
“Man piss at wind and wind piss back”
Unknown Author.
If you really need an MTP, intentionally design it, think it through and possibly delegate it to another device rather then CUCM.
As SIP negotiations and call scenarios are an in-depth topic I’ll stop here. If you are having issues with this, by all means, write in the comments below and we’ll do anything we can to help.
- SIP Options Ping
one last parameter that we need to understand in the SIP Profile configuration is the SIP Options Ping. This parameter will allow CUCM to monitor the trunk and check whether it is alive or not.
There are several events that will trigger Out of Service situation:- 503 Service Unavailable
- 408 Timeout
- Remote SIP device fails to respond.
Cisco IOS SIP Voice Gateway will, by default, respond to SIP Options Ping packets, under the condition that you can pass the security prerequisite.
CUCM SIP Trunk configuration
After too many words of caution, it’s time to finally configure out SIP Trunk.
This should really be the easy part, so lay back and choose the proper selection from the drop-down menu, you deserve it.
Go to Device–>Trunk–>Add New and create a new trunk.
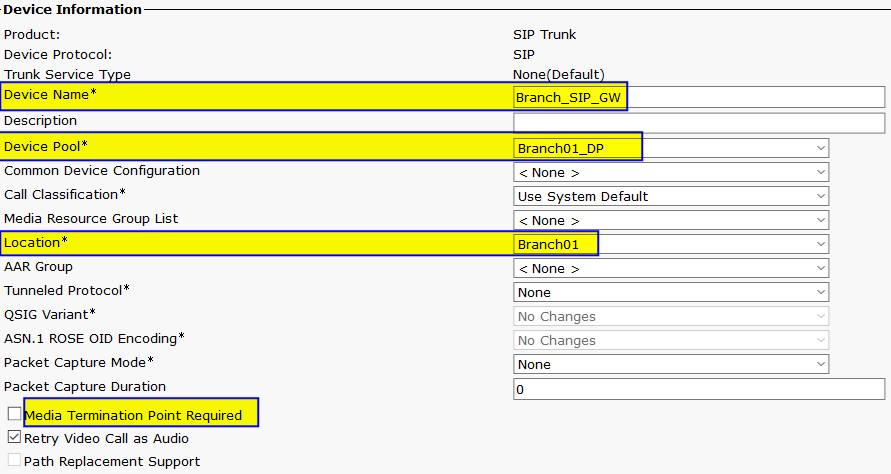
Add a Name, Device Pool, Location as configured and described in previous steps.
-
- Media Termination Point Required field.
If you want to override the dynamic MTP mechanism and insert MTP for all calls (not recommended), mark the check-box
- Media Termination Point Required field.
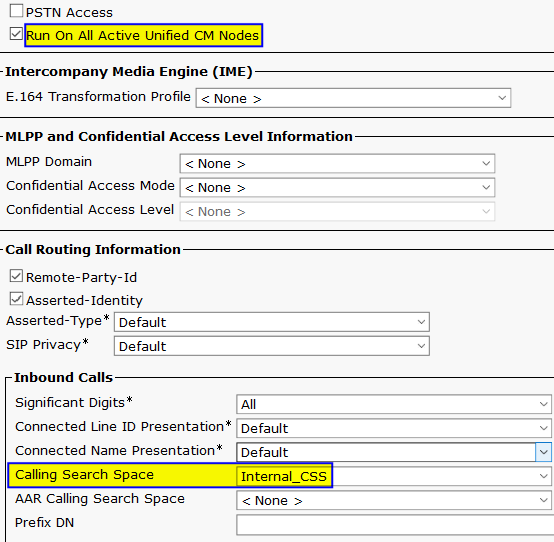
- Run on all active Unified CM nodes
This great feature is meant to reduce the number of intra-cluster communication (SDL) that is required to set up a call. To emphasize, without this parameter a call flow will act as follows:- Phone_A registered to CUCM_A makes a call that should go out to the PSTN via SIP Gateway B configured by the Device Pool to work with CUCM_B.
- In this scenario, all signaling communication will be respectively to the configuration which will require constant CUCM_A to CUCM_B communication for the call.
- Using the Run On All Active Unified CM Nodes parameter will allow any CUCM node to contact the destination SIP Gateway according to the source device of the call. In the scenario above, for example, only CUCM_A will be involved in the call.
In the Inbound Calls section, make sure that your CSS has access to internal extensions. A word of advice here, only allow your trunk to access specific dial-plan components (like an internal extension or a translation pattern) as this is the place where call loops are born and toll fraud live.
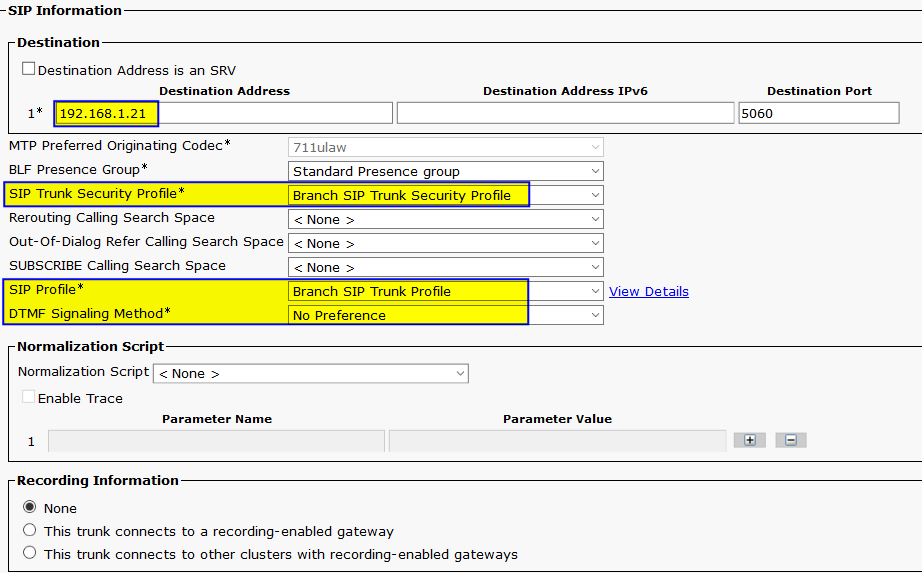
All that is left is just to assign the Destination Address, the SIP Trunk Security Profile that we’ve created and the SIP Profile and we’re done! Well, at least with the CUCM side.
Cisco SIP Gateway
Now that we’re done with CUCM SIP Trunk configuration it’s time to get the job done on the Cisco IOS SIP Gateway.
Like in the CUCM section, we will first configure all of the required parameters and only then apply them to the “Trunk” (Dial-Peers in SIP Gateway’s case).
For the most part, it should really just be matching the parameters to what we’ve configured in CUCM SIP Trunk.
Cisco SIP Gateway: General config
To begin with, we’ll have to set some general settings to prepare the field.
First, let’s allow SIP communication between VOIP dial-peers.
This is not a mandatory command as not all scenarios will require it, but what I’ve found is that eventually, I had to enable it for almost all of the Cisco SIP Gateway implementations.
voice service voip
 allow-connections sip to sip
Next step would be to Bind SIP signaling communication to the IP address that we’ve configured in the Destination Address in CUCM SIP Trunk configuration.
voice service voip
 sip
  bind control source-interface GigabitEthernet0/0
  bind media source-interface GigabitEthernet0/0
Cisco SIP Gateway: Codec selection
It’s time to look back at what we’ve configured in the Region section (link back).
What I usually do, is set up a list of codecs, by preference, in the Cisco SIP Gateway and use the CUCM region to decide which codec will be used.
For example, for a branch office I would configure:
voice class codec 1
 codec preference 1 g729r8
 codec preference 2 g711ulaw
 codec preference 3 g711alaw
 codec preference 4 g722-64
In CUCM Region, I would leave the default for Intra-Region (64kbps) and inter-region(8kbps) and would change the Max Bit Rate for specific Regions (like those assigned to fax machines) to 64kbps. This allows the flexibility for the SIP Gateway to use several codecs depends on the device it has to communicate with.
Cisco SIP Gateway: Fax over IP
Fax over IP is an in depth subject and deserves a post of its own. Basically, you can choose between the more reliable T38 and pass-through which uses the RTP stream to transparently send fax messages over it.
I’ve written about FoIP in the context of CUBE, it should give you a basic understanding of the concepts and pros & cons of each method.
Cisco SIP Gateway: DTMF
In the SIP Trunk: DTMF Signaling Method, we’ve configured no preference, using this method CUCM will try to minimize the usage of MTP while trying to select mutually supported codec.
Roughly, there are two preferred SIP DTMF methods that are widely supported by Cisco devices.
- Out-of-band (OOB): Sent in the signaling path.
- SIP KPML (Key Press Mark-up Language), defined by RFC 4730 is the preferred and supported method by Cisco.
- In-band DTMF: sends the DTMF as either raw tones in the RTP media stream or as signaled tones in the RTP payload using RFC 2833.
RFC 2833 is supported by most VoIP vendors and is the preferred in-band DTMF method by Cisco as well, supported by most of their devices.
For our SIP Trunk, these are the methods we will be using.
In each VOIP dial-peer, we’ll configure:
dial-peer voice 10 voip
  dtmf-relay sip-kpml rtp-nte
OK, now that we’re done with the appetizers, it’s time for the main dish. Dial-Peers here we come!
Cisco SIP Gateway: Dial-Peers
In IOS based SIP Voice Gateways there are two legs for each call. One incoming call-leg and one outgoing call-leg. Call-legs are changing with the direction of the call. For example, for incoming calls from the PSTN, POTS Dial-Peer will be the incoming call-leg while VOIP Dial-Peer will serve as the outgoing call-leg. For calls from CUCM to PSTN, VOIP Dial-Peer will be the incoming call-leg and POTS will be the outgoing.
Dial-peer structure
I use the following structure in my deployments, it’s best practice and makes troubleshooting a whole lot easier.
Incoming Dial-Peer from PSTN
Incoming Dial-Peer from CUCM
Outgoing Dial-Peer to CUCM
Outgoing Dial-Peer to PSTN
The next most important thing you have to deal with is (drums……) Dial-Peer matching. Give it a quick read and come back here to finish the job.
Now, that you are one step closer to enlightenment, let’s review some examples. I’ll use the following parameters:
DID is 21243XX
Outbound calls are prefixed with a 9
CUCM Pub: 192.168.1.10
CUCM Sub: 192.168.1.11
Incoming Dial-Peer from PSTN
Easiest way to catch all of the traffic coming from PSTN is to match the incoming called-number. I used ANY in this example, but you can set you DID range instead if you wish.
dial-peer voice 1 pots
 description incoming calls from PSTN
 incoming called-number .
 direct-inward-dial
Incoming Dial-Peer from CUCM
Using Incoming uri VIA is a great way to match calls coming from CUCM servers. First, CUCM will always replace the VIA field with its own address (or host). Second, it has the highest priority in dial-peer matching.
voice class uri 2 SIP
  host ipv4:192.168.1.10
  host ipv4:192.168.1.11

dial-peer voice 2 voip
 description incoming calls from CUCM
 session protocol sipv2
 incoming uri via 2
 voice-class codec 1
 dtmf-relay sip-kpml rtp-nte
 no vad
Outgoing Dial-Peer to CUCM
Nothing fancy here, it’s a good practice to keep the DID structure here with the destination-pattern command.
dial-peer voice 10 voip
 description Outgoing calls to CUCM-Sub
 destination-pattern 21243..
 session protocol sipv2
 session target ipv4:192.168.1.11
 voice-class codec 1
 dtmf-relay sip-kpml rtp-nte
 no vad

dial-peer voice 11 voip
 description Outgoing calls to CUCM-Pub
 preference 1
 destination-pattern 21243..
 session protocol sipv2
 session target ipv4:192.168.1.10
 voice-class codec 1
 dtmf-relay sip-kpml rtp-nte
 no vad
Outgoing Dial-Peer to PSTN
Create as many DP as you need for your dial plan. It should look something like this:
dial-peer voice 2 pots
 description Outgoing calls to PSTN - Int
 destination-pattern 9011T
 port 0/0/0:15
 prefix 011

dial-peer voice 3 pots
 description Outgoing calls to PSTN - LD
 destination-pattern 91[2-9]..[2-9]......
 port 0/0/0:15
 forward-digits 10
Basically, we are done here, but I like to tweak some parameters to make things work much smoother:
Cisco SIP Gateway redundancy configuration
If you have 2 or more CUCMs and one of them is down, it’s going to take your SIP Gateway quite a while to fall back to the next Dial-Peer (Dial-Peer 10 to 11 in the example above).
Exactly how long you ask? Well, to find out we need to look at two parameters: Retry count and Timer.
You can check it out running the following commands in your Voice Gateway:
SIP-GW#show sip-ua timers
 SIP UA Timer Values (millisecs unless noted)
 trying 500, expires 180000, connect 500, disconnect 500
 prack 500, rel1xx 500, notify 500, update 500
 refer 500, register 500, info 500, options 500, hold 2880 minutes
 , registrar-dns-cache 3600 seconds
 tcp/udp aging 5 minutes
 tls aging 60 minutes

SIP-GW#show sip-ua retry
SIP UA Retry Values
invite retry count = 6   response retry count = 6
bye retry count    = 10  cancel retry count   = 10
prack retry count  = 10  update retry count    = 6
reliable 1xx count = 6   notify retry count   = 10
refer retry count  = 10  register retry count = 6
info retry count   = 6   subscribe retry count = 6
options retry count = 6
We can see that the default timer is 500ms and the invite retry count is 6.
That means that I would take whole 3 seconds for our SIP Gateway to try our secondary Dial-Peer. For real-time communication that is way off the chart.
Adjust the timers and retry counts based on your network performance. If packet-loss and high delays are not uncommon, leave the config as-is. If your network infrastructure is solid, you can drop the retry count by half.
sip-ua
  retry invite 3
To make the timeout even shorter and the operation smoother, you can use the SIP Options Ping on the SIP Gateway side as well. This will allow the Gateway to identify and mark a CUCM node as down and skip dead-end Dial-Peers altogether, until the destination CUCM is up and running.
To enable SIP Options Ping, just add the following command to the VOIP Dial-Peers facing CUCM:
voice-class sip options-keepalive up-interval 30 down-interval 60 retry 5
The following error codes will busy-out the Dial-Peer:
- 503 – Service Unavailable
- 505 – SIP Version Not Supported
- No Response – Request Timeout
Cisco SIP Gateway security configuration
One last thing to note, if you use the Run on all active Unified CM nodes(link back) parameter (and you really should..) and you don’t have all of the CUCM nodes in your Dial-Peers, you must manually add the missing CUCMs to your IP address trust list:
Voice service voip
 ip address trusted list
  ipv4 192.168.1.12
  ipv4 192.168.1.0 255.255.255.0
Final words:
I know that this has been a lot to take, and building a trouble-free Cisco SIP Gateway takes some experience, I sincerely hope that this guide will bring you closer to achieving this goal.
I encourage you to ask whatever questions you may have in the comments below.

Build pro IOS configs. FAST.

